Saturday, October 15, 2011

Frame Fab Begins!


Fine tooth (10tpi) hole saws make a huge difference when mitering thin wall tubing.  It was the difference between a smooth accurate cut and the saw grabbing and coarsely cutting  through the material occasionally breaking a tooth along the way.


The Under utilized JD2 Model 32 bender on my home made stand


I Bought this over a year ago for another project that is now on hold. these benders are relatively inexpensive and do a great job of easily bending even large diameter tubing. I'm doing 1.375x095 at the moment and was surprised at how easy it was to bend compared to the Diacro bender I had been using. In all fairness the Diacro was never meant to bend tubing larger than 1 inch or so. However with the JD I didn't even have to use a cheater pipe on the relatively short handle as it gives you that much leverage. And with the added leverage ratio also comes more precise control over the bend.
First miters cuts of the day 
.


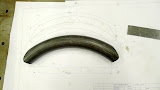
Here is the first bend of 1.375"x.065 wall. it's a 6.5" Center line radius with a 1.375" miter on each end. this is the center brace for the front swing arm which is the first frame piece I decided to make. That decision was based mostly on the fact that the other components are still in the design phase and subject to change where as the swing arm is done the drawings ready to go. Below is an image of the weldment model of the front swing arm so you can see where the parts I'm making here fit together.
Front Swing Arm Model In Solidworks


I am a complete green horn when it comes to working with tubing (even worse at laying out blog posts I might add). That said one of the fun challenges for me is figuring out how I’m going to accurately miter the tubing so that it fits together the way I have designed it. The videos on Youtube from guys trying to sell you a tube notcher show miters that are all dead easy to make. Most of the commercial notchers aren’t capable of making a very shallow miter cuts on a tube that already has a bend in it. They can’t be adjusted for cuts shallower than about 35 degrees, and only the very expensive ones can hold bent or non straight tubing. Hole saws also need a very ridged set up to cut well so again all but the expensive tube notchers out there aren’t very good in that department either. Motorcycle frames need to be much more accurate than roll cages or furniture, so starting with really precise clean cuts makes a huge difference. I've seen tutorial vidios on equipement manufacturrers web sites that show miters with large gaps between the tubes where the guys calmly states that he will just fill the hole when he welds the pieces together. Huge FAIL in my book. When it comes to a ridged set up a Bridgeport makes and excellent hole saw and that is what I used for the 2 cuts on the 1.375 cross brace. The 1 inch top loop brace is really for mounting and actuating the front Shock more than it is for actually stiffening the front swing arm. Where it meets the 1.375” main tubes is a shallow 15deg angle that produces a fairly long cut. I couldn’t think of an easy way to do this on the Bridgeport but had seen a notching system for using a lathe that seemed to offer an excellent solution (again a nice heave ridged machine tool). In the VMC I drilled and tapped a .75” piece of 7075 Aluminum with an array of ½-13 holes with some reamed 1.4” holes forfor pins for locating the work piece. There is a counterbored piece that bolts to the back of the plate that allows the whole fixture to be clamped into one of the Aloris tool holders so that it can be placed on and off the Aloris tool post easily. Moving the lathe compound slide is a very easy way to get very accurate angled cuts and also makes it very easy to adjust precisely where the saw starts to cut through the tube. Here you see the shallow 15degree cut that was actually very easy using this set up.


A Nice Fit


Posted by PicasaSome of the front swing arm parts ready for welding

No comments:

Post a Comment